Category Archives: crafts

Some yarn for the Mama…

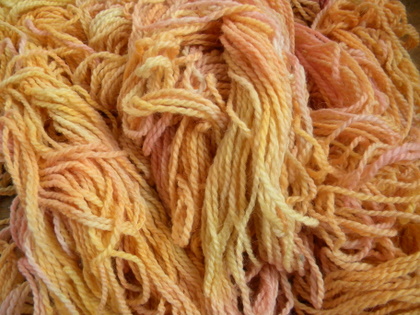
Remember that dyeing kick the Goosey Boy and I were on a while ago? Well, this is *my* Christmas gift from Galen.


All his idea, I swear! Though, I will confess to only setting out dyes in the colors I had in mind for a particular project…pink, yellow and peach. It puts me in mind of a sunrise or the colors of a Waldorf kindergarten. I’m thinking about this yarn, my Wee Girl, and springtime, all mixed up together.

It occurred to me this morning that I need to track down this yarn (and these too), because Christmas morning is just around the corner. Last time I saw this yarn, it was in a heap like this, on the floor, a few quick pictures later and it was unceremoniously tossed into a box, a box which ended up?!? I’d imagine it made it to the house, so that at least narrows it down a bit…


We’ve got another little dyeing project in the works for tonight after the very little people are in bed (hmm…still have to track down the supplies for the one too!). This time it’s *for* my little Galey-Boy and from his adoring brothers.

And now if you’ll excuse me, I apparently have some box sorting to do!

By

Saint Martin

“Golden light is turning gray,
Mist begins to rule the day,
Bare the trees their branches lift,
Clouds of dead leaves earthward drift.
Deep below, deep below
New life will spring.”

~Elijah’s illustration for the story of Saint Martin~


“Through the fields the beggar goes,
Weary feet and tattered clothes,
Trust that God will keep him warm,
Shelter him from cold and harm.
Deep below, deep below,
New life will spring.”

~ the opening song to “Saint Martin’s Play
Adapted from the legend of St. Martin by William Ward

This past Sunday, the children were in their first play; one angel, one soldier and one St. Martin himself.

I honestly felt that it was really spectacularly beautiful (even if the Littlest Angel, ahem Galen, did get bored halfway through, take off his sash and pretend to go fishing with it down from heaven).

We got the script for this particular version from a teacher at a local Waldorf school and I’m so glad we did. It was really just lovely, full of poetry and music.

We have two 2nd grade boys in our little group, so they played the role of Martin concurrently. We have two fourth graders at the moment as well and my hope is that our next performance will be related to the subjects they are studying. There has already been mention of a play geared toward our third grader this spring. I’ve been thinking about how great it would be if we as the parents could come together to put on a small fairytale (perhaps with puppets or marionettes?) for our kindergarten and preschool set.

Can you tell that I’ve been missing the theater days of my youth?

We were blessed with warm weather, which allowed us to stage the performance outside. I don’t think that this stone circle could have been more perfect for the show. And the fact that we were nearing dusk just made it all the more enchanting.

The performance was well received by our little audience of family and friends. And after we enjoyed a potluck dinner while waiting for the darkness to arrive in earnest.

Then we went out for our lantern walk, followed by spiced cider.

It certainly could have been worse, but during the walk, we didn’t exactly manage to foster the reverent atmosphere that we were hoping for. We had some set backs in the beginning with lanterns falling apart (not the ones that we just made). And I think that a big part of the issue was that we never really talked about it in advance and didn’t actually have someone set up to lead the walk.


live and learn.

We still got out there and we took our walk and sang our songs.

The three of us founding mothers all agreed, managing to pull off the play in such a short period of time was a mightily impressive task, there was no shame in not having the perfect walk too and there’s always next year.

By

A New Look


You would think that by now I would know better then to make promises about when my next post might be! I have sick littles again and lots going on besides.

As you can see, things are looking a bit different around here! We’re still working out a few kinks; changing and updating things takes a l-o-n-g time on dial-up!

This little blog of mine is coming up on it’s third anniversary. Wow. And it’s looked pretty much the same, with the exception of the occasional change of banner, for probably 2 1/2 of those years. It seemed like it might be time for a change. I’ve been kind of nesting for winter, if you will, both at home and now on-line. The goal is warm, cozy and homey all around. What do you think?

On the home front, apart from the vases of berries and evergreens now dotting our house, I made up this little banner last week to hang in the playroom.


I used the some of the leftover paper from making books for Halloween.

……………………………………………………………………………

It’s come to my attention that half of one of my posts has somehow gone missing. Very strange. Very strange indeed. I know I tend to be easily distracted, but I don’t normally just stop typing mid-word; honest. I do however make some hilarious typos and mis-types (like misspeaking, only with typing) when I’m really tired. For instance, when paging back to see if any of my other posts had been damaged, I noticed that in this post, I mentioned not wanting to have to bother with climbing on a latter, when clearly I meant a L-A-D-D-E-R. It’s a good thing I never take myself too seriously. I had a pretty good laugh at that one, as well as several others. I really am a fairly intelligent person, it’s just that I haven’t had a full night’s sleep in roughly a decade or so.

As for the half a post, I know it was all there at some point (there are even comments referencing the missing section). I’ll try to remember what I can and finish it up again at some point.

By

Leaf Mobile

Monday morning Galen woke up with a burning desire to make a mobile. I have absolutely no idea what inspired this, but it was all he could talk about all morning. Really, his resolve suited me just fine as I’ve always loved mobiles of all sorts. The only thing was to decide on what kind to make. Simplicity was of the utmost importance to me. And a bit mother nature’s bounty was the answer.


We gathered our leaves that day, though most of the ones around our home are decidedly past their prime. The blackberry bushes still yielded some interesting splashes of color. And the little bit of red oak available to us was still at it’s stunning best. We managed a bit of yellow from the birches. And really nothing says “autumn” like the big brown oak leaves anyway. And they are so sturdy that they we often find the wind skidding them around on top of a crusty snow; with no sign of a blemish or a crease.


We dipped our leaves in beeswax that evening before dinner.


Then our project sat until Wednesday. We had plans for a full family field trip on this day, but the rotation of this illness made it so that we had to divide up. Steve, out and about with the older boys, and me at home, tending under the weather littles.


Galen and I took this opportunity to string up our leaves and hang them in the playroom. It was hard to limit the kids when they were so enjoying dipping the leaves. Which meant that we ended up with a lot of leaves. And of course Galen insisted that we simply must use them all, making the resulting mobile quite large. It’s hung close to the ceiling and he can still reach it while standing on the ground.


It’s a bit lop-sided at the moment. One very large and heavy leaf fell off the end, setting it off balance. I kind of like it. We’re going to say it has artistic flair. A decision that probably had a lot to do with the fact that I have absolutely no desire to climb on a ladder to fix it!
By

A Halloween Piñata

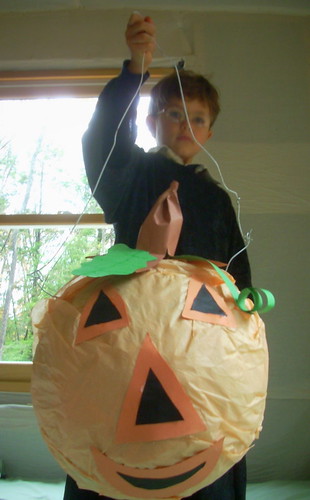
A new addition to our usual Halloween celebration this year was a piñata made by one Mr. Elijah Rain.

It turned out really well, I was impressed!


This is the first piñata that I’ve ever been called upon to fill. I grew up with ones full of gum balls, tootsie rolls and junky little plastic toys, so this required some thought.

Here’s what I ended up with:

  • Little baggies with lumps of clay
  • Colored pencils (some regular, some metallic and shimmery, some chunky for and built for little hands)
  • Some of my chocolates
  • Roasted pumpkin seeds
  • Gum (the stuff I mentioned here)
  • Raisins
  • Stickers
  • Glitter glue
  • Goji berry and orange white chocolate (which was wonderful AND a gorgeous bright orange!)
  • Nuts and dried berries

But my favorite thing was these little blank books that I made, simple though they are:

I’m on a big fancy paper kick at the moment. I love all of the fun and inspiring prints out there. The covers for these (which all have a coordinating print on the inside) came from an autumn inspired craft paper pack that I found on clearance at the craft store.

I wanted to add in green chips and popcorn, but I didn’t get around to making them. A friend suggested polished rocks and gem stones and another mentioned bouncy balls, both great ideas, but didn’t have time to get any. I was kicking myself for not thinking to add packets of some of the seeds that we gathered from our garden. I thought about those little gnomes made of a felt cloak stuffed with some wool, but that was one of the treats a couple of years back and my family has just received some fresh ones, so I filed the idea away for the future. Maybe whistles of some sort? Or kazoos? I thought bells would be fun. Friendship bracelets? Honey sticks? Small felt animals?


I should have ample opportunity to use all of my ideas. Iain already made a piñata for his birthday in January (let’s just hope it holds up well in the attic) and Galen just announced that he wants one for his birthday too. So, if anyone else has any inspired ideas, put them out there because I’ll be needing them!

~Sometimes I suspect that Elijah actually *is* Harry Potter!~

Now, perhaps you’ve noticed that I have a nasty little habit of making the simplest of things exceptionally complicated?

You see, the things is, I don’t like the whole piñata mentality; this rushing and pushing and shoving to grab as much as you can. Kind of puts me in mind of that poor person being trampled to death at a holiday sale last year. I’m just not comfortable with it. And when you are looking at an age range like we were (from not yet 2 to nearly 10), there are very good odds on the little people being pushed aside, with huge discrepancies between treat bags resulting. Beyond which not all of the filler was appropriate for all ages.

Enter The Grand Plan.

I had this idea to turn it into a kind of treasure hunt. I made each child a bag with their name on the front. On the back was a child specific list of star stickers, with each combination matching a prize in the piñata. So, for example, 2 year old Rosa would have the combination for raisins, but not for gum. Each child was to seek out one of each thing on his or her list, with the older ones helping the little ones once their own bags were full.

I know, me and my ideas! A little too rigid perhaps? Too structured? My fear was that a) it would be too convoluted, and b) it would negatively impact the joy and spontaneity of the moment. I may never know. I didn’t exactly get to see my grand plan in action…
On Halloween morning Steve was feeling kind of off, but still running errands and going about his usual business. By noon he was slowing down and not looking so great. At 1 I was optimistically filling the piñata. By two he was unconscious on the futon in the middle of the living space, despite the four kids crowded around him and making a racket. And by three I was calling to cancel. Did I mention that he spent last week in training classes at work, closed up in a small room with two other guys, both of whom currently have children diagnosed with swine flu? Yeah.
By

And what we did with them…

The pumpkins that is!


This is where I left Steve in the kids; all set up to make jack ‘o lanterns, while I went down to the other house to wash up.

And this:
is the kind of ridiculousness that I came back up to.

Right.

But jack ‘o lanterns were made. I find that there is a year or two where kids r-e-a-l-l-y want to do some carving, but aren’t yet ready to wield a knife (or well, their parents aren’t yet ready for them to). For those in between years, when painting is no longer satisfying, we’ve taken to using an apple corer. It works great! Mom or Dad can get it started and the kiddo in question can push it the rest of the way through. The experience of poking those perfectly shaped holes is deeply gratifying to little people and it creates a really funky and unique pumpkin. All lit up it’s kind of reminiscent of a disco ball! Even the big kids wanted to borrow the apple corer to embellish their lanterns.


With these gigantic pumpkins all scooped out there were lots and lots of seeds for roasting:


I tend to do something different with these every year. This year we did them up in olive oil, curry, and sea salt with a touch of cinnamon. My kids all love curry, so it seemed the way to go.

And from the flesh we had…pie!


I can’t give you a recipe for the filling, unfortunately. It was very, very good though, made with coconut milk and maple syrup and just the right combination of spices. I promise that in the event that I ever have running water again, I will have loads of recipes to share, but for now… the prospect of having addition dishes to wash, just to have exact measurements, well, let’s just say it’s too much. When I can just eye-ball it and get everyone here fed, I do.

I can, however, give you a recipe for the crust I used (because my vitamix has the measurements already marked out, right there on the side).

Almond Crust

2 Cups ground almonds
4 T coconut oil
2 T agave nectar
pinch of salt

Grind up all the ingredients together in a food processor until well combined, but still coarse. Press into the bottom of a pie pan and bake at 350 for 10 minutes. This makes two crusts.

This was really good in a different, hearty and harvest-y kind of way. I do think that I’m still going to do a more traditional pumpkin pie crust for Thanksgiving though. I’m feeling like, as enjoyable as this was, it didn’t quite fulfill my need for that once a year fix.

By

Autumn in the Playroom

These are some snapshots from our play area. It’s not really a room unto itself, but something of a room-sized alcove off of our main living area. It’s completely open to the rest of the main floor, but it also has it’s own defined space and it’s own feel. With all of my blunders in designing this house (and there were many), this room I did right. It works exactly as I envisioned.

It’s a space to be apart, but still near by. It can all spill out into the living area, but at the end of the day there is a specific place to tuck up all the toys, giving the grown-ups room to roam.

I was inspired to bring a bit of fall to the room this week. It was starting to take on a neglected air. I finally reinstated a nature table, albeit a very low key one. What few autumn books I could find are set out in a crate for easy access. I’m considering doing some selective unpacking to reclaim the rest. With pressed leaves in the windows and a row of pumpkins atop the kitchen set, it’s feeling considerably more festive.

By

Crafting with Little Ones

I think a lot of people are intimidated by the idea of crafting with young children. This is a simple, open-ended project that anyone with basic hand-sewing skills can share with a child. All it takes is some time and patients. You can decide how much or how little you would like your child to be involved. In our house this was a full hands on project for 3 year old Galen.

~Front view of the “Angel Baby” Galen created as a first birthday gift for his sister~

Step 1: Decide (and if necessary figure out!) what your child would like to make. We narrowed down Galen’s list of things to these three: a rainbow dog with a jingling bell in it’s tummy, a rainbow bird with a jingling bell in it’s tummy and a rainbow angel with a jingling bell in it’s tummy.

Before we could start I needed to get a better idea of what he had in mind so that I could do my best to stay true to his vision. Talking helps to figure out where to start, but to get a really clear idea, you have to move beyond that, which brings us to step two.

Step 2: Get out a large sheet of paper and start drawing. If the child you are working with is very small, then sketch what you think they might be talking about. Let them tell you all the things that are wrong with your drawing! It’s ok. This is their project, you’re just the facilitator here. Keep going. Make the head bigger where they say, add a tail, or bat ears, etc, until they are happy with the shape. Beware of the child that likes to make mommy do tricks! At some point you might have to say, “You know what, I’ll draw over 10 sheets of paper taped together for you some other time. I think we should keep this project about this big.” And then show them just what would work best.

An older child may very well be able to draw just what they are looking for, right off the bat. We’ve made a lot of these little stuffed toys over the years, and each is as unique as the child who designed it.

Step 3: Now that you have your basic, and hopefully fairly simple, design, it’s time to trace it. You can use regular tracing paper, Swedish tracing paper, tissue paper, a scrap of interfacing; whatever you have around. Just clearly trace the pattern.

Step 4: Pin it to previously selected fabric and cut. If you are planning on Kool-Aid dying the fabric (as we did with this particular one) then it would be best if the fabric is wool. Wool felt would be ideal since there won’t be any fraying on loose edges. Our Angel Baby was made from a lightly felted wool jersey.

Step 5 (optional): Painting the fabric. I offered one color at a time of a strong mix of Kool-Aid for him to paint directly on to the fabric with a paint brush. Once the painting is done, the fabric needs to be steamed for approximately 40 minutes and then rinsed well.

**At this point it’s probably time to put this project away for another day. Don’t be afraid to start an on-going project with a young child. So long as you are clear up front about the time line, they will be fine with it, and excited about the next time a crafting day comes around.**


Step 6: Sewing. I find that embroidery floss and a large doll makers needle are best suited to this type of sewing. For most stuffed animals you will just be sewing a front to a back and then maybe adding on some ears or something afterward. For this project I had the idea of cutting out a circle and layering a piece of skin tone cotton underneath. Be careful with your cutting though! I thought this was a sweet idea that would get him closer to what he was looking for, when in fact, it made him cry! There is a certain line that needs to be walked between anticipating and guessing at what their real goal is and letting the project really be the way they see it. You can’t always be sure which one you are doing! I’ve had it go both ways. One of the first things Elijah ever made was a doll with green skin, red eyes, a gold mouth and a purple hat. I made some suggestions of “normal” eye colors, but he wasn’t interested and he walked away very please with his work. Other times I’ve had a child bemoan the fact that something that they were making didn’t look like a “real, for real…”(moose in the case that I’m thinking of) because I held my tongue and didn’t make suggestions to improve it. I say this not to turn you off the idea of sewing with a little one, but to give you an idea of how to make a positive experience.

I told Galen that if he didn’t like how this one turned out, we would make another one, exactly the way he wanted it. Thankfully, he ended up loving this one and no more tears were shed.

Back to the project: We did some very simple embroidery for the face, then I pinned it to the underside of the front piece and stitched around the opening. Next we pinned front to back (wrong sides together) and stitched most of the way around, leaving an opening for stuffing. As you may or may not be able to see, Galen requested may colors of embroidery floss in keeping with the rainbow theme!

We used a basic whip stitch here.

I would like to offer a few tips and ideas for sewing with preschoolers:

  • sit them on your lap so that you can guide their work
  • keep the thread or floss relatively short so that it’s less likely to get tangled
  • take turns between you doing the sewing and placing the needle for them to pull through
  • sing songs while you sew
  • don’t sit or try to attempt this for very long stretches
  • when the child is not actively sewing, let them pull out pins and return them to the pin cushion
  • take advantage of the times when their attention is on another part of the project to make some headway yourself. With this project, I did a lot of sewing while he was picking out a bell for the tummy and carding some wool.
  • It’s best to do the tricky parts yourself and save the long, straight stretches for the little guy.

Step 7 (also optional) : Carding the wool for stuffing. You can use any kind of stuffing for a project like this, but I’m partial to wool. All the better if the kiddo gets to card the wool himself. Some day I’ll have a set of nice carders, but for now we just use two dog brushes. They are inexpensive, easy to obtain, and have the added advantage of being an excellent size for small hands.

Step 8: Stuff your project. You can use a chopstick or the eraser end of a pencil to make sure that the stuffing gets into all the little nooks and crannies. Little people love helping with this part. When your project is about half-way stuffed you can add in a bell or a rattle, if so desired.
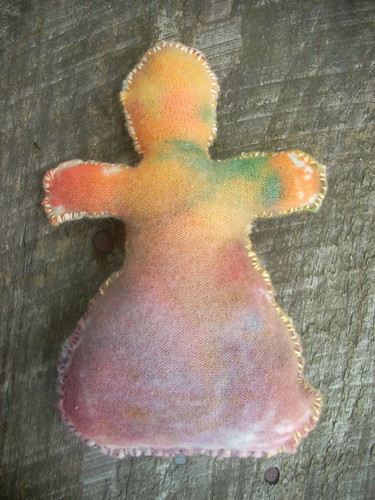
~Back view~

Step 9: Sew up your opening and go play! Enjoy your truly one of a kind creation and the joy on your child’s face as they run up to everyone they know shouting, “Look what I made!”.
By